---------------------------------------------------------
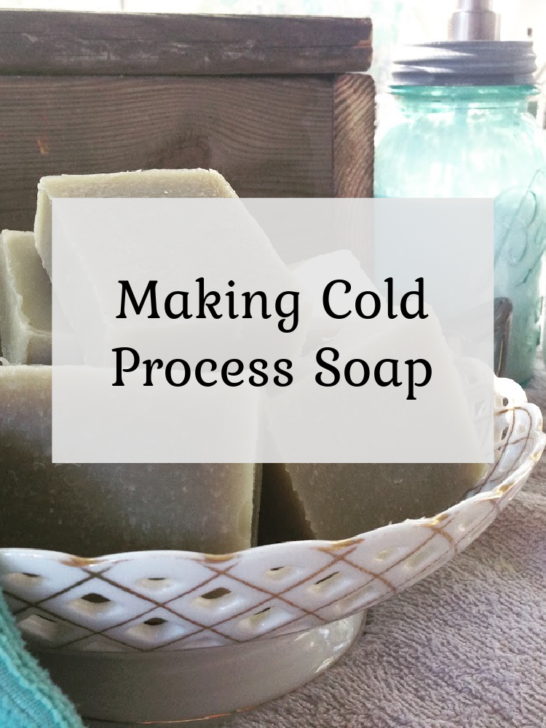
Soap making has come a long way since your grandmother’s day. Ingredients that would have been exotic and unheard of in her day, you can pick up at your local grocery store. I am always looking for an outlet for creativity and with soap making you get something useful that your family will use every day. Homemade soap also makes a great gift!
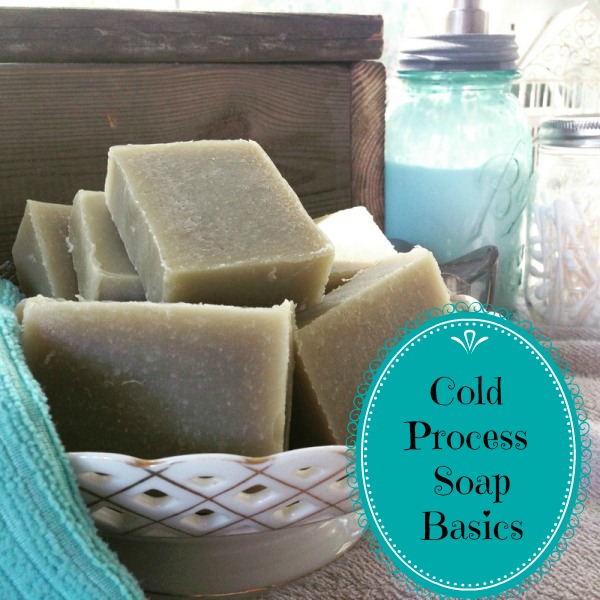
The process isn’t hard, but until you get the hang of the way things work it’s definitely a good idea to follow instructions EXACTLY. Once you feel more comfortable you can start experimenting with different oils, additives, colors, & fragrances. The possibilities are endless! There are 3 techniques for soap making – cold process (no cooking), hot process (the batter is heated in a crock pot), and melt & pour (pre-made soap base). The one we will discuss here is cold-process soap making. Click here to learn about melt & pour soap making. I like cold process soap making the best because I feel like it gives you the most options for adding fun ingredients and doing different designs, and it makes a nice smooth bar.

All About Lye
Most of the ingredients in soap making are perfectly safe & food-grade, but there is one exception. When making bar soap you need to use sodium hydroxide, commonly known as lye. Lye has many uses including as a commercial cleaning agent, drain cleaner, papermaking, chemically peeling fruits & vegetables, and even making bagels & pretzels.

Lye is actually the common name for two different compounds – sodium hydroxide and potassium hydroxide. Potassium hydroxide (KOH) is made when wood ash (potassium carbonate) is mixed with water and is used to make liquid soaps. Wood ash lye is the catalyst soapmakers of the distant past would have used to make their soaps as wood ash was readily available. The resulting soap was more of a paste soap and often burned the skin. The method they would use to test the lye was to drop an egg in the lye liquid and see if it floats. Not the most scientific method! No wonder their soap often burned! Thankfully modern manufacturers of both sodium & potassium hydroxide have methods to test each batch to ensure a quality product.
Sodium hydroxide (NaOH) is produced by electrolyzing (the process of using electricity to split water into hydrogen and oxygen) concentrated salt water. Sodium hydroxide is the type of lye commonly used to make bar soap.
In soap making lye causes a chemical reaction called saponification when it is mixed with fats (oils & butters). During saponification, the lye and oil molecules are changed into soap molecules.
Soap Making is Science, not Cooking
Think back to science class where you learned that when you mix an acid (the oils) and a base (lye) it will cause a chemical reaction. You have to measure accurately to get the proper reaction. Our goal is to add just enough lye to cause saponification, but not too much that lye is leftover in your finished soap. Too little lye and your oils won’t turn into soap, it will just be a bowl of oil. Too much lye and the soap could burn when you use it.
Properly done, each sodium hydroxide molecule will combine with an oil molecule, transforming it so it is no longer oil or lye, but a new soap molecule. This ensures that all the lye is consumed and there is none leftover in the finished product.
Many people might remember Grandma’s “lye soap” as something that was very harsh on your skin and maybe even burned. This can happen when you don’t measure properly.
It isn’t necessary to understand all of the science behind saponification to make soap, you just need to remember that this is CHEMISTRY not cooking. You need to measure carefully, and you need to take appropriate safety precautions.
Superfatting
Most soap recipes will have you add more oil molecules than needed, a process called super fatting, which will leave the leftover oil molecules to clean & moisturize your skin. I typically super fat my soap recipes at 7%, which means I have 7% extra oils – those oils will moisturize your skin. A good cleaning soap or laundry soap would have a 0% super fat. You don’t want extra oils on your clothes! But to use a 0% soap on your skin would be very drying. With a normal recipe, you don’t want to go much above 10-12% or the bar could feel slimy or mushy.
Safety Precautions
Lye is extremely caustic. It will react with the oils on your skin and could burn you. Left completely unattended on your skin it could eat down to your bone. If you inhale the fumes, it can chemically burn your lungs, if some splashes in your eyes, it can burn your retina. If some lye or active soap batter should get on your skin, immediately flush the area for several minutes with cool water.
You will know long before any type of damage is done to your skin. If you accidentally get some lye on your skin you will first feel a little itchy area of heat, it will start to tingle more the longer the lye sits on the skin until that tingle turns quite painful. You will clearly know something is wrong. That is your sign to go flush the area with lots of running water. I have made thousands of batches of soap and while I have accidentally gotten lye on me, it has never been bad enough to leave any wounds or scars behind.
Lye is no joke, please handle it with care. But you don’t have to be scared of it, just respect it and take the proper precautions. If you have young kids, wait until they are in bed and your pets have settled down so no one is running around while you are working. Tie up your hair, wear long gloves, a face mask, & safety goggles. Work in a ventilated area. Do not use your soap-making bowls or utensils for food (once you use them for soap, they should be marked & stored away from your normal food prep supplies). Make sure your extra lye is in a locked cabinet, kept out of reach of kids and pets.
Lye can be tricky to find in stores. It can be sometimes found at hardware stores, just make sure it is pure sodium hydroxide with nothing else added to it. It really is just easiest to order it online. I buy mine here
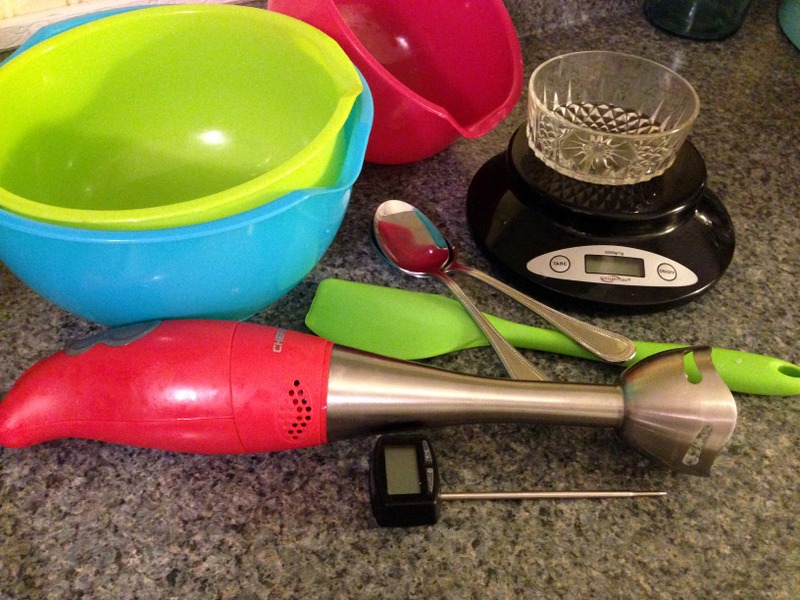
Equipment you need to get started
You will need to gather up some equipment before you get started. Try searching thrift stores or yard sales to see if you can find some of this second-hand to keep costs down. As I mentioned before, none of your soap-making supplies should ever be used for food prep to avoid cross-contamination. Mark them and keep them outside of your kitchen so other family members won’t use them by mistake.
You don’t want to use any aluminum equipment as that can react with the lye. Stainless steel bowls are perfect and easy to clean. If you use plastic, be sure to get thick, sturdy plastic (like PP#5) because lye will eventually etch and eat through the thin plastic. Lye can also etch and shatter glass in time so it’s best to avoid that.
- several heat-resistant bowls
- spoons & rubber spatula
- immersion blender with stainless head
- digital kitchen scale
- digital thermometer
- long rubber gloves
- face mask (preferably one rated for chemicals)
- safety goggles
- something to cut your soap
- soap mold (you can purchase soap molds, or use a silicone baking mold)
Ingredients for making soap
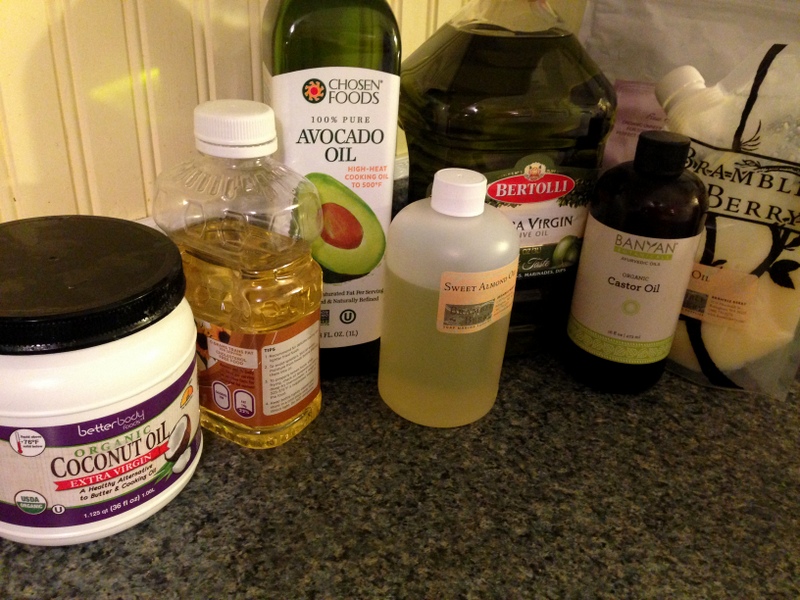
Really the sky is the limit here! You can go fancy and use oils like Meadowfoam, Apricot Kernel Oil, Mango Butter, or Cocoa Butter. You can also use basic oils you’d find at the grocery store like olive oil, coconut oil, or sunflower oil. An excellent website for soap makers is Brambleberry.com, they have every kind of oil, butter, & fragrance you could want. They also have a blog with great soap recipes to try and YouTube videos on design techniques. It’s a great resource for beginning soap makers.
Soap Calculator
You will want to familiarize yourself with a Soap Calculator. I like the one here. Input the oils you want to use and the percentage of the recipe each oil represents (for example 34% olive oil, 33% coconut oil, 33% palm oil). It will calculate the exact amount of lye, oils, and liquid for your recipe in pounds, ounces, or grams.
The soap calculator is also a great way to see the properties different kinds of oils will add to your soap. It will give you an estimate of where your recipe lands for quality in areas like hardness, bubbles, moisturizing, and conditioning. By adding or deleting different oils you can customize your soap in the areas important to you!
I run every single recipe I try through the calculator, even if I am using a recipe I found on a reputable website or book, just to double-check the work. Anyone can make a typo, and you don’t want to end up wasting ingredients with a lye-heavy soap. The soap calculator is also handy when you want to substitute an oil in a published recipe for one you have on hand. Different oils require different amounts of lye to saponify. A new oil could cause the lye measurement to be different so it is important to run any changes through the calculator.
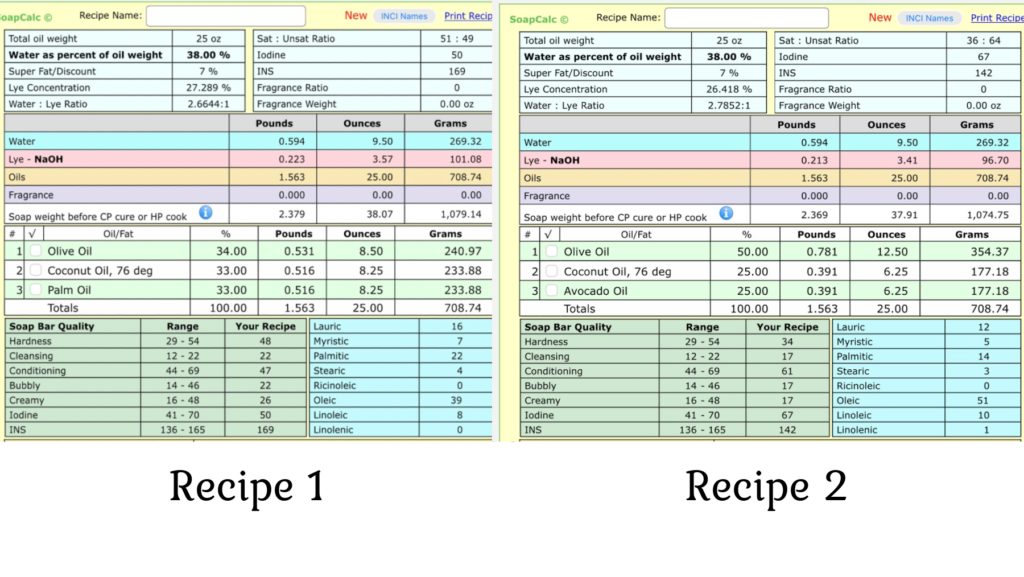
Above are two similar recipes done on SoapCalc.net. Recipe 1 is 34% Olive Oil, 33% Coconut Oil, and 33% Palm Oil. Recipe 2 is 50% Olive Oil, 25% Coconut Oil, and 25% Avocado Oil. The recipes are similar, both are 25 oz of total oil and call fo 9.5 oz of water. But you will see recipe 1 needs 3.57 oz of lye and recipe 2 needs 3.41 oz of lye even though they are very similar.
Looking at the quality scores, you can see recipe 2 where we replaced the solid-at-room-temperature palm oil with liquid avocado oil it significantly lowered the hardness score and the creamy score. Recipe 2 will produce a softer soap that might not last as long. Coconut Oil is the cleansing oil in this recipe, you can see that the cleansing score for recipe 2 is lower because we lowered the amount of coconut oil. The conditioning score for recipe 2 went way up thanks to the addition of super rich avocado oil. Both recipes are similar and fall within “normal” ranges, it’s all about what kind of soap you want to make!
Fragrance or Essential Oils
Unless you are looking to make an unscented soap you will want to add either a frangrance oil or essential oils. Fragrance oils are synthetic and professionally blended to achieve certain scents. They will often have multiple notes combined together to make a nice overal fragrance (for example they might blend lilac, rose, peach, strawberry, and musk to make a light floral fruity scent. Be sure you are using quality fragrance oils that have been formulated for use in soap otherwise it could ruin your soap batch.
Essential oils are the natural way to scent your soap. There is some debate on weather any of the benefits of the essential oil survive the saponification process of if they simply provide a natural scent and aromatherapy. Essential oils will come as single notes that you can use alone or you can mix together to make your own blend.
Both fragrance & essential oils have recommended uses rates that will be different for each oil. For fragrance oil, the manufacturer should provide safe usage rates (Brambleberry has a calculator for their fragrances found here). For essential oils, I recommend the calculator found on Modern Soapmaking, you can enter your own custom blend and it will give you safe usage amounts. Find it here
Basic Soap Recipe:
34% Olive Oil
33% Coconut Oil
33% Palm Oil
These three oils are some of the most commonly used in soap making. Olive Oil is very moisturizing, Coconut Oil is cleansing, and Palm Oil is great for lather & hardness. After your first batch, you can try adding more oils (sometimes 7 or 8 oils!) each one adding something special to the mix. But let’s start small and simple.
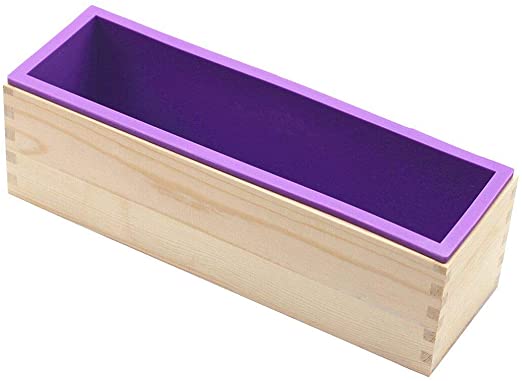
The recipe we are working with requires 25 oz of oils. This will fill the above pictured 10 inch silicone mold about 3/4 of the way. In the soap calculator, change the weight of oils to 25 ounces and change the super fat to 7%. Leave the water setting at 38%. With experience, you can play around with changing the water % but for now, let’s just leave it there. Select the three oils and add the percentages. Hit “calculate recipe”, then “view/print” and you are ready to go! For this recipe, we will need:
8.50 oz Olive Oil
8.25 oz Coconut Oil
8.25 oz Palm Oil
9.5 oz water (use room temperature distilled water)
3.57 oz lye
fragrance or essential oils for scent (optional) –
clay, micas, infusions, oxide powder or other colorant (optional)
For this batch, I am going to add 1/2 tsp sea clay and 0.5 oz lavender essential oil mixed with 0.5 oz rosemary essential oil.
Measure & Prep
First, clean the kitchen! You will need plenty of clear counter space, and an empty sink (no dirty dishes)
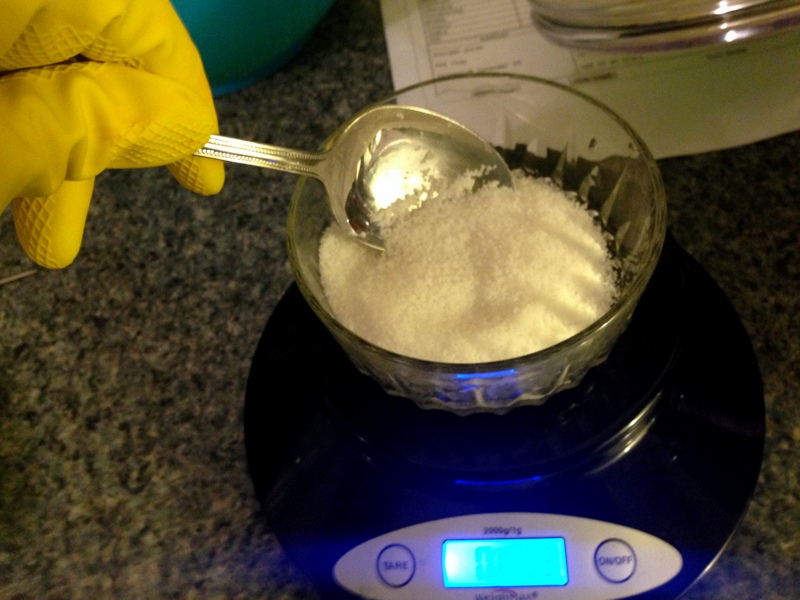
Measure out your distilled water. Put on your gloves, goggles, & mask. Measure your lye. Pour the lye into the water (never pour the water into the lye as it can splash up).
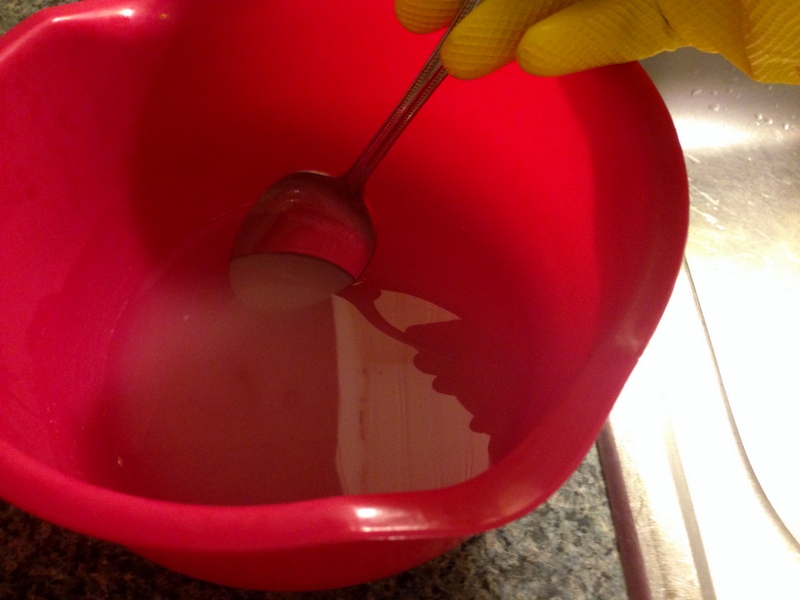
Stir the lye water until the lye is completely dissolved. DO NOT LEAN OVER BOWL. Try to keep your face as far back as possible and keep your mask on because as the lye dissolves it will give off fumes that you do not want to inhale. The mixture will start off foggy, but will be clear when totally dissolved. Stir until you feel the lye crystals have dissolved.
Once the lye mixes with the water, it will heat up very rapidly. Depending on how much water/size of bowl it can easily reach over 200 degrees within seconds. Set aside your lye mixture and allow to cool. I like to set my bowl of cooling lye in the sink. Allowing the lye water to cool in the sink ensures that if for some reason your container fails or someone bumps it, you don’t have a chemical spill in your kitchen.
While the lye water is cooling we will work on the oils. Measure each of the oils and add to a large bowl. You can take your gloves, goggles, & mask off for this part if you like, they are bulky to wear and the oils aren’t going to hurt you.
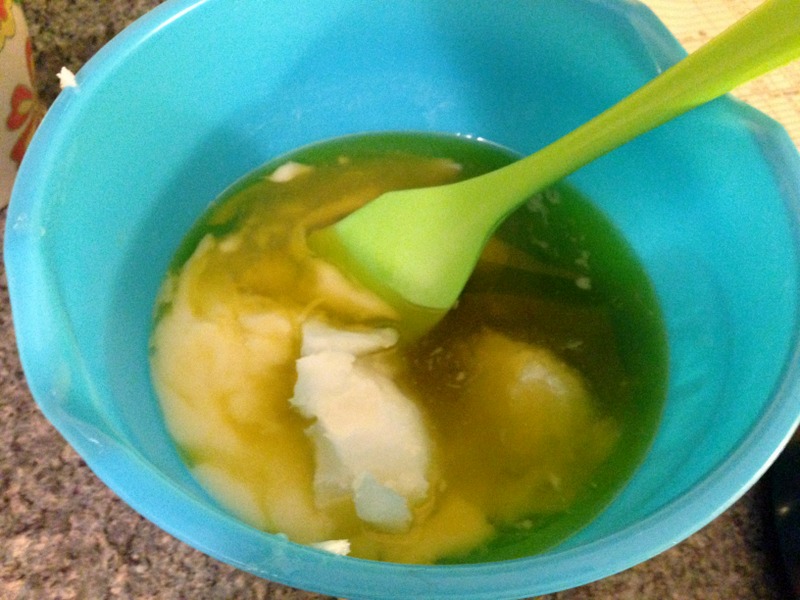
Put the bowl in the microwave for 30 seconds. Stir well. Put in for another 30 seconds. If using a stainless steel bowl, you could put the bowl over a pot of boiling water like a double boiler. Continue until the oils are completely melted together.
And now we wait
We need to wait for the oils & lye to cool. The goal is to get both the lye water and the oils to be under 120 degrees. It is not the end of the world if they cool off too much. In fact plenty of soapers prefer to use room temperature oils & lye water. The more important thing is to get them both under under 120 degrees and ideally the oils and lye water should be within about 10 degrees of each other.
While we are waiting for everything to cool, it is time to measure out any additives to your soap. You can add essential oils, fragrance oils, minerals for color, clays, purees….there are so many options! I am going to add some dispersed sea clay to this batch (1/2 tsp sea clay mixed with 1 tsp olive oil). Dispersing the clay into a little olive oil helps it to blend into the soap instead of sitting there in chunks. I am also adding some lavender & rosemary essential oils for fragrance. Don’t add them yet, just get everything ready & measured out.
Let’s make some soap!
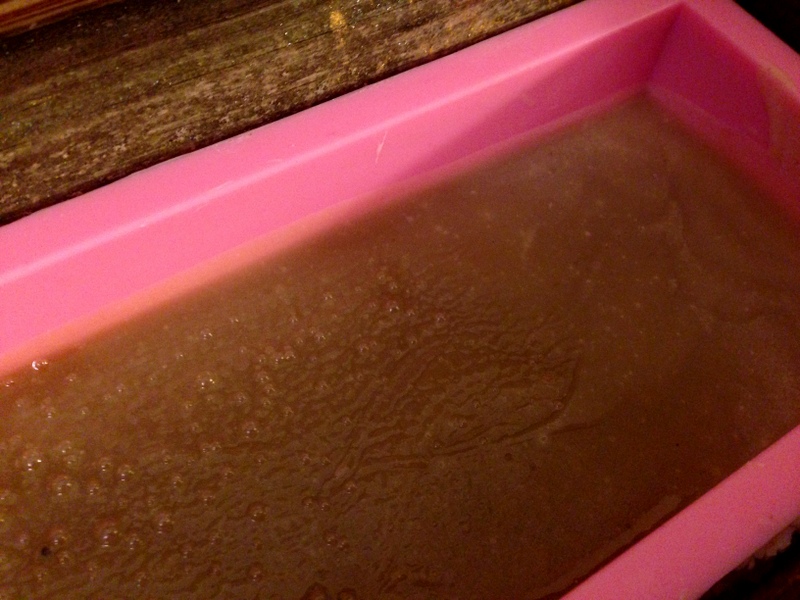
Once your oils & lye water are the proper temperature, it’s time to put your gloves, goggles, & mask back on. Carefully & slowly, pour your lye water into your oils. Try to avoid splashing. Tap your stick blender against the bottom of the bowl a couple times to release any air bubbles, then thoroughly blend, being careful as you move your stick blender around that you do not splash any of the mixture around.
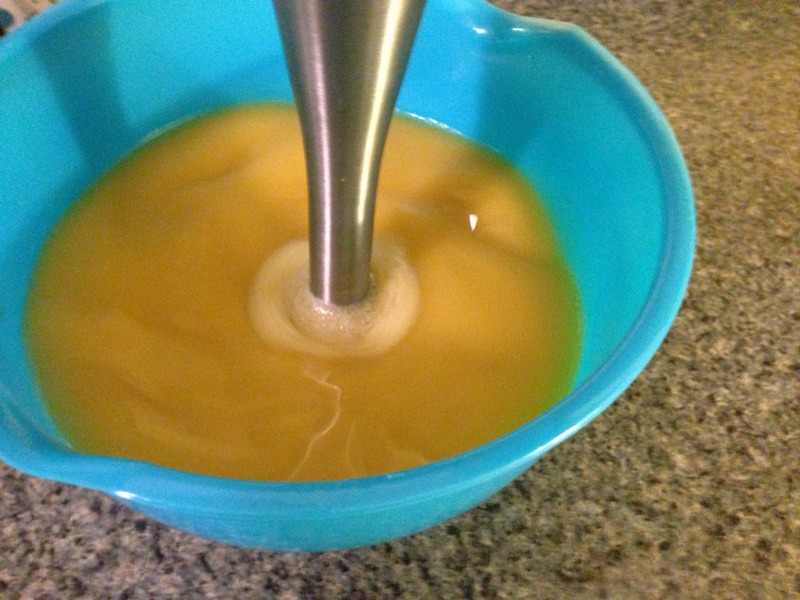
After you have blended & stirred for a few minutes, you will notice the mixture begins to thicken. This is known as trace. If you lift the blender out, the mixture that dribbles off should leave a light trace before sinking in. A medium trace will be the consistency of thin pudding.
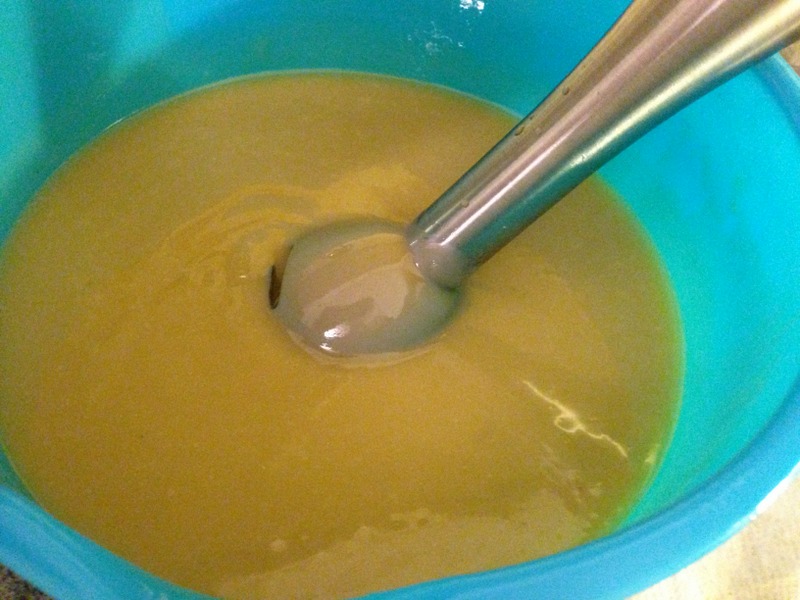
Now is the time to add your fragrance or any additives. Add it in and hand stir with your spatula. The chemical process of saponification began as soon as you mixed the lye and oils to together. The longer you wait, the thicker your batter will get as it turns to soap. Some fragrances and additives can make it go even quicker, so don’t over blend.
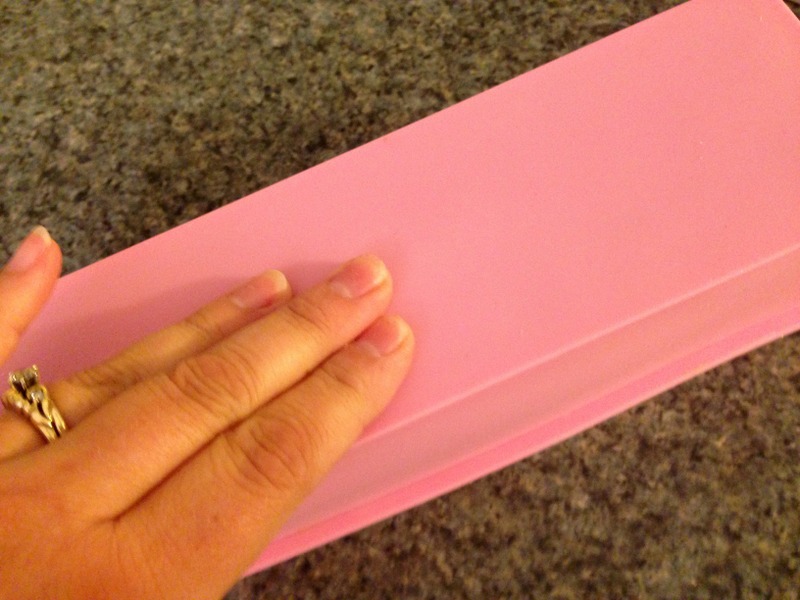
Carefully pour the mixture into your soap mold.
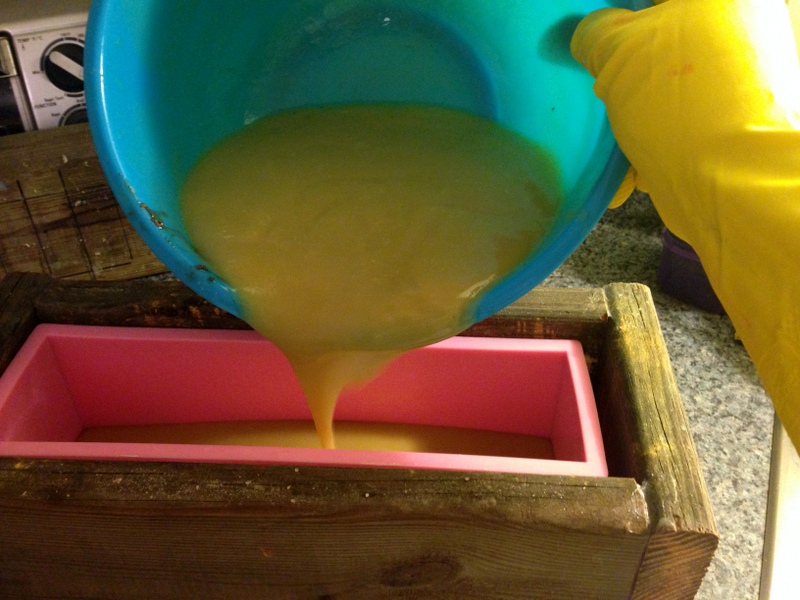
Tap the mold against your counter a few times to loosen any air bubbles that might be trapped.
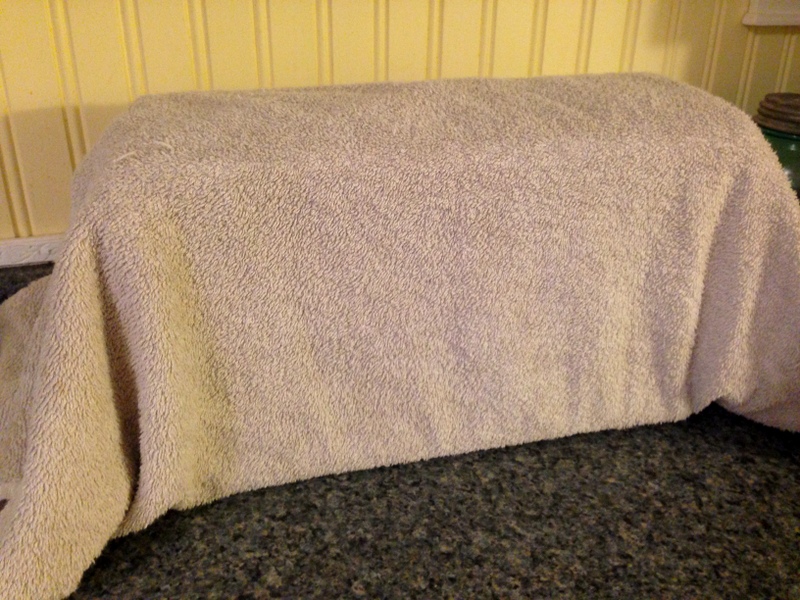
Cover your mold or wrap it in a towel. Wrapping your soap keeps the warmth inside to help your soap reach the gel phase. If you don’t insulate, your soap may not completely gel. A partial gel can leave discolorations that are not harmful, but might disrupt your design. Insulating can also make the colors brighter. There are some exceptions to the insulating rule, particularly with recipes that contain food ingredients like honey or sugars. They should not be insulated and can even be left in the refrigerator. The natural sugars in the these recipes could cause the batter to overheat to the point where it could volcano out of the mold! But for this recipe today, we will insulate.
Clean up
Now it’s time to clean up your soap making tools. Keep your gloves & goggles on for this so the soap batter doesn’t get splashed on your skin. If you have any unused batter, scrap as much as you can into the trash so it doesn’t turn to soap in your drains. Put all the bowls, spoons, and tools in the sink. Using hot water and dish soap wash everything. You can use paper towels, an old dishrag, or sponge set aside just for soap cleanup. When you are done, let the hot water run in your sink for a bit to flush the batter from your pipes. Finally, wipe all your work surfaces (counters, sink) with diluted white vinegar. Lye is an extreme base and vinegar is an extreme acid so it can work to neutralize any stray lye on hard surfaces. DO NOT put vinegar on your skin if you have splashed lye on it, it will make the burn worse! Vinegar is just for cleaning hard surfaces.
the hardest part is the wait….
I know it’s tempting, but let your soap sit for at least 24 hours wrapped up. When you check on it, you disrupt the temperature. I peeked at mine so you can see it – this is after about 12 hours.
You can see the soap mixture is nice and dark and has a clear glycerin look – this is the gel phase. You can see the tiny air bubbles that came to the surface when I tapped the mold on the counter. They will go away by the end of the process.
After 24 hours you are ready to unmold! Loosen your mold along all four sides. The soap will still be slightly soft. If it doesn’t release from the mold easily, let it sit for another 10-12 hours. Sometimes when you pour at a thin trace, it can take a little longer to unmold.
Flip the mold upside down and gently run your hand along the bottom to completely loosen the soap from the mold.
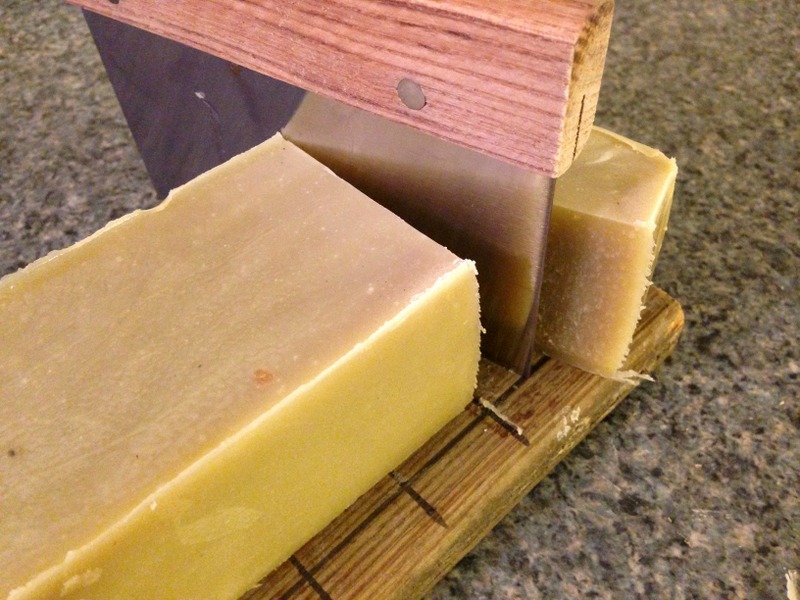
Now you just have to cut it into bars. Try to keep them evenly sized. All the lye is consumed at this point so you can use a kitchen knife to cut the bars. You could also use a miter box, metal dough scraper, or slab cheese cutter for super straight edges & even bars.
After the 24 hours is up, saponification is complete and there should be no lingering lye left in your soap. BUT it is not ready to be used yet. If you used it now, it will pretty much dissolve into a gooey mess. The soap needs to cure for 5-6 weeks. During that time, the excess water will evaporate out of the bar, leaving you will a nice, hard, final bar of soap. Let it stand on one of the narrow edges. The more of the bar that is exposed to the air, the faster it will cure.
That’s it! I know it sounds like a lot, but once you make a batch or two you will totally have the hang of it and you will be ready to try more complicated recipes, or even come up with some amazing ones of your own!
Does this seem too overwhelming for right now but you still want to enjoy handmade soap? Click here to check out my soap shop!
Want to check out some of my shared recipes?
Moksha Lifestyle
Friday 30th of April 2021
Great Article… I love to read your articles because your writing style is too good, it is very very helpful for all of us and I never get bored while reading your article because, they are becomes a more and more interesting from the starting lines until the end.
Mehreen
Friday 7th of February 2020
Nice ...and thank you for easy recipe ...☺ ..
Soap World
Monday 8th of August 2016
Hi, I developed a special soap calculator to calculate the % of Glycerin inside the natural soap I would like to invite all the users to try it and let me know your comments. The Soap calculator is here: http://www.soapworld.biz/soap-calculator-handmade-soap.html Bye !